How to build your own Social Audio chat application - Part 2
The best ideas start as conversations. That, and coding on the weekends
- 🗓️ Date:
- ⏱️ Time to read:
Table of Contents
Welcome to Part 2 of this series on how to build a social-networking app that enables you to have conversations in real-time using audio. In this tutorial, you'll continue to build a social audio application similar to Clubhouse and Spotify Greenrooms.
To recap, here’s the list of features:
Feature #1: Discover new rooms in the hallway. You already built this in Part 1.
Feature #2: Users can enter a room to talk, and have conversations with people with similar passions and interests.
Feature #3: A user can opt to leave a room anytime they feel like on the click of a button
Make sure to read part 1 thoroughly before you proceed!
What you will learn and Build
In this tutorial, you’ll learn how to mimic and build the feature that enables users to join a room and interact with each other via audio in real time! Here’s a side-by-side comparison of this room feature across different apps — Clubhouse, Spotify Greenrooms and Twitter Spaces:


Components for enabling real-time communication using audio or video
For enabling real-time communication, you need a few key components. Here are the most basic components for a peer-to-peer network architecture 1:
A Media Input and Output Device
If you’re reading this on a computer or a smartphone, your gadget very likely comes along with a microphone, speakers and a webcam. Most modern browsers also can request the user for permission to access one of these input devices using JavaScript.
WebRTC
A technology that is built in open web standards, and is part of most modern browsers. Using WebRTC, you can transmit audio, video and generic data directly between different clients.
WebRTC can be a bit complicated to use. So for this tutorial, you’ll make use of PeerJS, a library that abstracts away all the underlying implementation complexity so that you can focus on building the functionality.
A signaling server
For WebRTC to work, each client (a web browser, or an Android or an iOS application) will need the peer information 2 of every other client in the room or network in-order to establish a webrtc peer connection. A signaling server’s job is to let peers in the room or network find each other by providing information about each peer in the room, so that they can establish a WebRTC connection.
The WebRTC specification does not provide APIs to implement this signaling mechanism. So it is left up-to us developers to figure out a way to provide information of the peers to every other peer in the network, so that they can communicate with each other. But fret not, there are a lot of techniques you could use!
How to implement a Signaling Server
Technique #1: Using a database that supports real time updates
The Codelab in the official WebRTC website describes how to implement the signaling server using this very technique, with the help of the Cloud Firestore database. Here’s a brief description of how it works:
- On the client-side — when you join a room, a new entry is made in the database with your user information such as your username, name, and most importantly — your peer information.
- Other users (clients) within the room are connected to this database, and are listening for changes and updates. When they detect that a new participant (a.k.a you) has been added to the database, they receive your information along with your peer information.
- Now using this peer information, these clients can establish a peer connection with you using WebRTC protocols.
Any database that allows subscribing or listening to database changes or updates can be used as a signalling server to transmit the peer information between clients.
Technique #2: Using regular HTTP requests
Here’s how this technique could work:
- Upon joining a room, the client makes a POST request to create a new entry in the database with the new particpant’s details and peer information.
- Other clients in the room would either:
- Use a regular polling technique, where they keep making network requests to an HTTP API endpoint at every given time-interval, to check if any new participant has joined or not. OR
- Use a long-polling technique, where the server keeps the connection alive for as long as it can until it can send some new data to the client.
As you can very well imagine, regular HTTP requests have several drawbacks:
Drawbacks
- Long-polling can be highly resource intensive especially when there are multiple clients connected with the server.
- Regular polling technique isn’t really “real time”. And again, the shorter the intervals, the more resource intensive it can be!
Traditional HTTP requests like GET and POST initiate a new connection request and later close the connection after the server sends back the response. If you were to attempt building a real time app using HTTP, the client would have to initiate requests at regular intervals to check for new information (which may or may not be available). This is because of the fact that the server itself is unable to push information on its own.
And this is highly inefficient — the client would waste resources in constantly interrupting the server and saying “Hi, I’m XYZ — let’s shake hands. Do you have something new for me?”, and the server will be like — “Hi (shaking hands). No I don’t. Good-bye!” over and over again, which means even the server is wasting resources!
So moving on to another technique —
Technique #3: Using Web sockets
This is perhaps the most common way to implement a signalling server.
What are Web Sockets, and how do they work?
Using Sockets, you can send and receive information via events, or in other words signals. There can be different types of such signals, and if the parties involved know what kind of signal to ‘listen’ to, then there can be an exchange of information.
Unlike HTTP requests, web-sockets create a persistent connection between a client and the server. So this way the client need not keep asking the server, the server can push information when it needs to. This method is much more efficient for building real time applications.
For implementing the signalling server, you’ll make use of web-sockets with the help of socket.io. Here’s how this technique would work:
- Upon joining a room, the client emits a web-socket event with its peer information and other details. Let’s call this event
user-joined-room. - The web-socket enabled server listens for any
user-joined-roomevents. When it receives the event, it makes a new entry in the database, and adds the new participant’s socket to the room or channel. Next, it broadcasts a web-socket event and sends the new participant’s info and peer details to all connected clients within that channel. - Any clients within the room are also listening for a
user-joined-event. As soon as the server broadcasts the new participant’s information from the previous step, they receive the peer details and then can use it to initiate a WebRTC connection.
Feature #1: Enter a room to participate in ongoing conversations
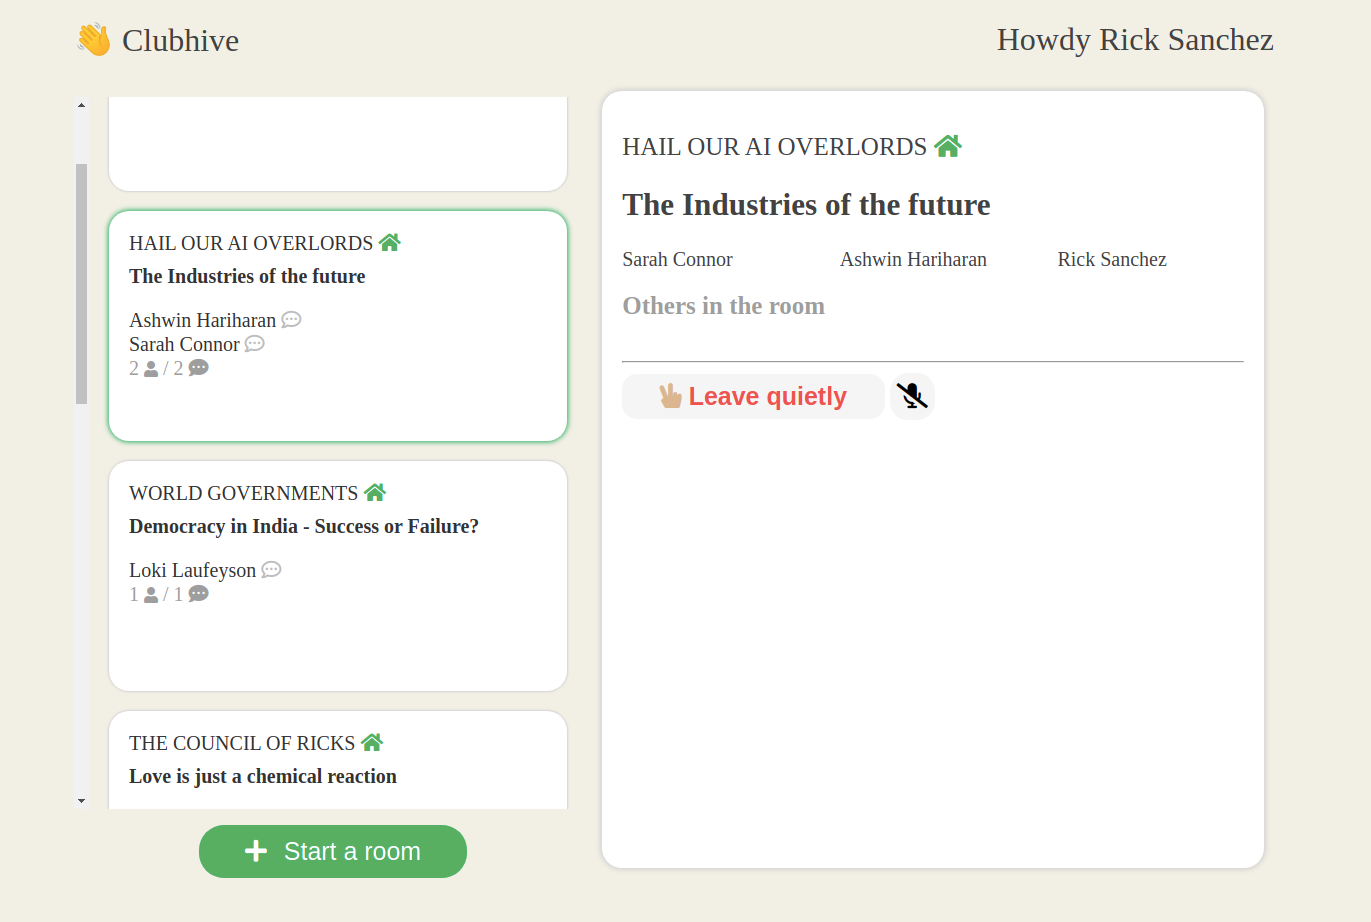
In the last tutorial, you replicated the hallways feature, where you see a list of rooms from the clubs that you follow. Now when a user clicks on a room, they should be able to enter the room, listen to other speakers within that room, and be able to participate in the conversation.
Step #1: Adding details of a new participant in the database, and sharing their peer information with all clients in the room
Backend
First, we’ll write a function that adds takes in information of the new participant and creates a new entry in the participants table.participant to the Add the following code inside /models/participants.js:
async function addParticipant(participant) {
    try {
        const text = `
            INSERT INTO participants (room_id, user_id, role, peer_id)
            VALUES ($1, $2, $3, $4)
            ON CONFLICT (room_id, user_id)
            DO
                UPDATE
                    SET join_date = NOW(), peer_id = $4
                WHERE participants.room_id = $1 AND participants.user_id = $2
            RETURNING *
        `;

        const values = [participant.room_id, participant.user_id, participant.role, participant.peer_id];

        const res = await db.query(text, values);
        return res.rows[0];

    } catch (err) {
        console.log(err.stack);
    }
}
If the participant already exists, we just update their join-date field to the current timestamp.
Next, you’ll configure our web server to listen for any user-joined-room events. When it receives an event:
- You add/subscribe the new participant’s socket to the room that they wish to join.
- Next, you’ll use the above function to add the participant information in the database.
- Then, you emit a
user-joined-roomevent to the rest of the clients within that room. That way, any clients that are subscribed to this room and listening to this event will receive the participant’s details. - Finally, you’ll update the participant that they’ve joined the room by using a callback.
Open socket-events.js and write the following logic:
socket.on('user-joined-room', async (eventInfo, callback) => {
    socket.join(eventInfo.roomId);

    const participant = await db.addParticipant({
        room_id: eventInfo.roomId,
        user_id: eventInfo.user.id,
        role: 'SPEAKER',
        peer_id: eventInfo.peer_id,
    });

    participant.name = eventInfo.user.name;

    socket.to(participant.room_id).emit('user-joined-room', participant);

    callback(participant);
});
For keeping things simple, we’ll add a new participant as a speaker by default. In the real Clubhouse app however, when a new user joins a room, they are part of the audience and need to request the room moderators in-order to be added to the speaker panel.
Front-end
First, you’ll use the peerjs constructor to issue the current client a unique Peer ID. This ID will be necessary for establishing a webrtc connection with another peer.
Inside modules/webrtc.js, add the following code:
export const peer = new Peer({
    host: location.hostname,
    port: location.port || (location.protocol === 'https:' ? 443 : 80),
    path: '/peerjs'
});

peer.on('open', (id) => {
    console.log('My peer ID is: ' + id);
    updatePeerId(id); //save this ID
});
- Our NodeJS web-server is configured to issue a new Peer ID upon calling new Peer
- When a connection to the Peer-server is established, it generates a unique random identifier string. We’ll save this ID in a variable
PEER_ID, which we can use later.
Next, you’ll write a function joinEvent that you’ll call when a room is selected. Here’s how it works:
- Emit a socket event
user-joined-room, and send the room-id, the user information, and thePEER_ID. - The signalling logic that you wrote earlier will receive this event, and create a new entry in the participants table, and will notify the client once its done.
- Once the client has been notified, you’ll make a network request to fetch the room info, and then display it in the UI. The user is now officially in the room!
Add the following code inside /modules/index.js:
function joinRoom(roomId) {
    socket.emit('user-joined-room', {
        roomId,
        user: USER_INFO,
        peer_id: PEER_ID,
    }, async (response) => { //callback
        updateParticipationInfo(response);
        console.log('PARTICIPATION_INFO', PARTICIPATION_INFO);

        fetchRoomDetails(roomId).then(result => { // fetch room info
            renderRoomDetailsSection(ROOM_INFO); // display room
        });
    });
}
Now, you’ll just call the above method when a room card is clicked:
export async function onRoomSelect(e) {
    if (USER_INFO.id && PEER_ID) {
        selectRoomNode(e.currentTarget); // Highlights the selected room
        const roomId = e.currentTarget.getAttribute('data-id');
        joinRoom(roomId);
    }
}
- Similarly, other clients connected to this room would also need to know if a new participant has joined. Add the following code:
socket.on('user-joined-room', handleNewParticipantJoin);

async function handleNewParticipantJoin(participantInfo) {
    console.log('user-joined-room', participantInfo);

    if (participantInfo.role === 'AUDIENCE') {
        ROOM_INFO.audience.push(participantInfo);
        const audienceList = document.getElementById('audience');
        displayParticipant(audienceList, participantInfo);
    } else {
        ROOM_INFO.panel.push(participantInfo);
        const panelMembersList = document.getElementById('panel-members');
        displayParticipant(panelMembersList, participantInfo);
    }
}
Try testing this out!
- Open two new browser tabs on Chrome: http://localhost:3000?username=rick and http://localhost:3000?username=elon.
- Scroll through the list of rooms, and select one that’s common between the two to join.
- You should be able to see the names of the participants appear one-by-one, in the order by which they join.
Now that you’ve successfully managed to exchange participants information with each other in a room! Next, you can use this peer information to stream information back-and-forth:
Step #2: Connect with the peers in the room, and stream their audio
In the previous step, we merely iterated through the list of speakers in the panel and displayed their names in the UI. Along with displaying their name as a text, we’ll now also do the following:
Basically, any new participant that joins the room will also be the one to initiate the peer connection. So upon joining the room, you’ll iterate through the list of participants. If they’re not the current client/user:
- Initiate a call using the participant’s peer-id. If the current user is part of the panel-list, then stream their audio as well
- If the participant is also part of the panel, then add an audio element in the UI, and attach their audio stream to this element so that the current user can hear them speaking.
Add the following code inside modules/helpers.js:
async function displayAndConnectWithRoomParticipant(
    containerElement,
    participantInfo
) {
    if (participantInfo.peer_id) {
        const participant = displayParticipant(
            containerElement,
            participantInfo
        );

        // establish peer connection
        if (participantInfo.user_id.toString() !== USER_INFO.id.toString()) {
            let mediaStream;

            if (PARTICIPATION_INFO.role !== 'AUDIENCE') {
                mediaStream = await openUserMedia();
            } else {
                mediaStream = new MediaStream();
            }

            if (participantInfo.role !== 'AUDIENCE') {
                const participantAudio = createParticipantAudio(participantInfo.user_id);
                participant.appendChild(participantAudio);

                const call = peer.call(
                    participantInfo.peer_id,
                    mediaStream,
                    {
                        metadata: {
                            participantInfo: PARTICIPATION_INFO
                        }
                    }
                );

                call.on(
                    'stream', attachAudioStream(participantInfo.user_id, participantAudio)
                );

            } else {
                const call = peer.call(
                    participantInfo.peer_id,
                    mediaStream, {
                        metadata: {
                            participantInfo: PARTICIPATION_INFO
                        }
                    }
                );
            }
        }
    }
}
When the other participants receive the peer connection request, they’ll need to accept the call as well.
Add the following inside modules/webrtc.js:
peer.on('call', async function(call) {
    const participantUserId = call.metadata.participantInfo.user_id;
    console.info(`call request from ${participantUserId}`); // if call requester part of speaker panel,stream their audio

    if (call.metadata.participantInfo.role !== 'AUDIENCE') {
        const participant = document.getElementById(`participant-${participantUserId}`);
        const participantAudio = createParticipantAudio(participantUserId);
        participant.appendChild(participantAudio);

        call.on(
            'stream',
            attachAudioStream(participantUserId, participantAudio)
        );
    }

    // if part of speaker panel, send own audio stream
    if (PARTICIPATION_INFO.role !== 'AUDIENCE') {
        const localStream = await openUserMedia();
        console.log('Answer the call');
        call.answer(localStream);
    } else {
        call.answer();
    }
});
This way, the other peer responds to a connection request and similarly exchanges their own audio information with the other peer. And we have a 2 way communication / audio flow established!
Try testing this out!
- This time, you’ll need the help of a friend to test the feature. You can use localtunnel to generate a unique URL that exposes your localhost server temporarily to the internet.
- Just like earlier, Open a browser tab localtunnelurl?username=rick on Chrome, and share another URL localtunnelurl?username=elon with your friend so that they may open it on their browser.
- When you both join the same room, you should be able to talk to each other!
Feature #2: Leave a room

Here’s the breakdown of the application flow:
- Upon leaving a room, the client emits a web-socket event
user-left-room, with its peer information and other details. It’ll also close all the peer connections between the rest of the participants in the room. - The web-socket enabled server listens for any
user-left-roomevents. When it receives the event, it’ll unsubscribe the user’s socket from the room, and remove the participant from the database. Next, it broadcasts a web-socket event to notify the other participants in the room that the client has left. - Any clients within the room are also listening for a
user-left-roomevent. As soon as they receive the notification from the server, they simply remove the user from the UI.
Front-end
On the current client, upon leaving a room you’ll emit a user-left-room event, close the existing peer connections, and update the UI and reset the store:
export function leaveRoom() {
    if (PARTICIPATION_INFO.user_id) {
        socket.emit('user-left-room', PARTICIPATION_INFO);
        closeConnections();
        updateParticipationInfo(null);
        resetRoomDetails();
        unselectRoomNodes();
    }
}

document.getElementById('leave-room').addEventListener('click', leaveRoom);
The other clients would also need to be notified when a participant leaves, and update their UI as well:
socket.on('user-left-room', handleParticipantLeave);

async function handleParticipantLeave(participantInfo) {
    console.log('user-left-room', participantInfo);
    if (participantInfo.role === 'AUDIENCE') {
        ROOM_INFO.audience = ROOM_INFO.audience.filter(obj => obj.user_id !== participantInfo.user_id);
    } else {
        ROOM_INFO.panel = ROOM_INFO.panel.filter(obj => obj.user_id !== participantInfo.user_id);
    } removeParticipantNode(participantInfo);
}
Backend
You’ll need two functions in models/participants.js:
- A function
removeParticipantthat deletes a participant from the database - A function
updateParticipantthat updates a participant’s peer information in the database and sets it to null. We’ll use this method if the user is the room’s host.
async function removeParticipant(roomId, userId) {
    try {
        const text = `
            DELETE FROM participants
            WHERE room_id = $1 AND user_id = $2
            RETURNING *
        `;

        const values = [roomId, userId];

        const res = await db.query(text, values);
        return res.rows[0];

    } catch (err) {
        console.log(err.stack);
    }
}

async function updateParticipant(roomId, userId, peerId) {
    try {
        const text = `
        UPDATE participants SET peer_id = $1
        WHERE room_id = $2 AND user_id = $3
        RETURNING *
        `;

        const values = [peerId, roomId, userId];

        const res = await db.query(text, values);
        return res.rows[0];

    } catch (err) {
        console.log(err.stack);
    }
}
Be sure to specify the WHERE clause when you delete an entry from the table, else you risk deleting all the data!

Next, your signalling server logic in routes/socket-events.js:
socket.on('user-left-room', async (eventInfo) => {
    socket.leave(eventInfo.room_id);

    let roomParticipant;

    if (eventInfo.role !== 'HOST') {
        roomParticipant = await db.removeParticipant(eventInfo.room_id, eventInfo.user_id);
    } else {
        roomParticipant = await db.updateParticipant(eventInfo.room_id, eventInfo.user_id, null);
    }

    socket.to(eventInfo.room_id).emit('user-left-room', roomParticipant);
});
And that’s pretty much it. You might need the help of your friends to test it out!

Next Steps
Obviously, what you build here is a hyper-simplified version of Clubhouse. But you can use this as a starting point and replicate more features.
Some features that are worth replicating
Creating a new room
Notice that in the bottom of the UI screen there’s a button that says “Start a room”? Well, you can code the functionality for it:
- On the UI, display a form where you can enter in the name of the new room, and optionally assign it to an existing Club.
- On the backend, create an API that takes in the name of the room, and adds a new room entry in the database
Creating a new club
Similarly, you could also add a feature that let’s people start their own clubs. Might even throw in an invite feature that lets club creators invite other users to follow a member or become a member.

Memberships
Remember how a user can be a follower in other club? Well, turns out that in the actual app, a user can also be a member of many different clubs. Starting a room within a specific club requires the user to be a member of that club.
When you incorporate memberships in your ERD, it would look like this:

Any guesses on what type of relationship exists between a user (member) and a club? HINT: It’s similar to the followers relationship that you read in the previous article
And several more features!
- Mute/un-mute yourself within a room
- Request to speak — new participants get added to the audience list by default, and will get added to the speaker panel on request.
- A Chat messaging feature
When deploying an app in production for real users, there are several other considerations as well.
Architectures, Scaling and Costs
Peer-to-peer (P2p) network
What we covered in the tutorial was an example of a WebRTC implementation using a peer-to-peer (P2P) or a mesh network architecture. In this, each peer or participant that is a speaker upstreams their media (audio, video or both) to n-1 other peers in the network. Every peer also needs to downstream the media from other peers so that they may consume it. This is decentralized in nature, as no central server is being used to route media information.
Advantages
- Easy to understand and setup.
- Low set-up costs and less resource intensive on the server side, because the server isn’t being used to process media streams.
- Better privacy due to decentralization — because the data (audio) is upstreamed and downstreamed directly by the clients in the network, without passing via a server.
But this setup also has drawbacks
Drawbacks
- A mesh network suffers in streaming data reliably as the number of peers or participants in the network increase. More number of peers will overwhelm the bandwidth because they’d need to stream their audio or video to n-1 other peers. Besides, cameras that can capture video in 4K are becoming commonplace — and if you’re building a video streaming platform, then this can cause issues like audio and video lags.
- Besides, most browsers can only reliably support a fixed number of connections — for instance as of today, the officially supported limit for Google Chrome is 500 connections.
- Although less resource intensive on the server side, a mesh network can be more CPU intensive on the client side, because each peer would need to process data while upstreaming / downstreaming for
(n-1)connections in the network - Better privacy also comes at a drawback of not being able to store/record conversations either.
So commercial products mostly don’t rely on a peer-to-peer architecture. In-fact, Google Hangouts uses a peer-to-peer connection only for 2 participants.
So if you’re trying to build and deploy a product for commercial purposes, and you anticipate a large number of persistent peer connections, there are other network architecture that need to be considered, which implement centralized video bridging techniques:
Selective Forwarding Unit (SFU)
Unlike the peer-to-peer architecture, in this network each participant sends their encrypted media streams only once to a centralized server, called an MCU server. This server then forwards those streams to the other participants, without any processing.
Advantages
- The bandwidth to upstream media becomes quite less — the participant only needs to upload the information to the central server.
- More scalable than peer-to-peer network due to the less number of connections required.
- Easier to manage and store media data.
Disadvantages
- Although more scalable than the peer-to-peer network, it still has limits.
- Some of the computation power is now offloaded to the server side. So the setup costs become a lot more.
- Not ideal for privacy, as media streams are being passed via a central server.
- Having a central server also means that it can potentially be a single point-of-failure.
Multipoint Conferencing Unit (MCU)
Also called Multipoint Control Unit, this architecture is similar to that of SFU — each client is connected to a centralized server. Unlike SFU however, the MCU server decodes, rescales, and mixes all incoming streams into a single new stream and then encodes and sends it to all clients.
So any client in the network only need to upstream and downstream a single media stream.
Advantages
- Extremely easy on bandwidth.
- Much more scalable than peer-to-peer architecture
Disadvantages
Just like the SFU architecture, the drawbacks of the MCU architecture are similar. In addition to it:
- Extremely CPU intensive on the server side — since the server not only just streams media information to all the connected peers, but now also needs to transform media streams from all participants before sending it.
- Very high set-up costs
- Since all media streams are combined into a single one, the user can’t control or disable audio/video reception from a specific participant.
You might want to leverage a cloud-based WebRTC service provider for enabling real time communication, rather than implement your own WebRTC logic. That way, your app could easily support large numbers of users. It isn’t uncommon for a Clubhouse room to have several thousands of users, especially when a celebrity is speaking!
There are several WebRTC service providers, like Agora.io, Twilio and Amazon Connect that offer SDKs with APIs to integrate WebRTC into your app. In-fact, when Clubhouse launched in 2020, they seem to have relied on Agora for powering their audio chat!
I’m curious to see what you build next!
Thank you for reading.
Here’s the complete source code for reference. In case you have any questions regarding the tutorial, please leave a comment below!
If you’re a committee or an organization and would like help in building more such solutions, reach out at digital@egen.solutions. As a digital-native company, we at Egen know how to scale up and deliver fast, which means that we can help you create and launch such apps in days instead of months!
One good conversation can shift the direction of change forever.
References & Resources
- Approaches for scaling WebRTC
- Comparison between peer-to-peer, SFU and MCU
- How Different WebRTC Multiparty Video Conferencing Technologies Look Like on the Wire
- MCU architecture advantages and disadvantages
- Video presentation on Real-time communication with WebRTC: Google I/O 2013
- Video teleconference Wiki
- Whitepaper on Zoom’s connection process
- How Zoom Provides Industry-Leading Video Capacity
- How Discord Handles Two and Half Million Concurrent Voice Users using WebRTC
- Whitepaper on Real World Options for Multipoint Videoconferencing
- WebRTC Hacks
Originally published in Egen Engineering.
-
In other architectures, you’d also need several other components, such as a media server for encoding and decoding media streams. ↩︎
-
In the native WebRTC spec, this peer information is referred to as ICE candidates, standing for Internet Connectivity Establishment. The PeerJS library abstracts away all these details and instead provides you with a simple peerID string, which clients can use to establish a WebRTC connection. ↩︎